
If you’re like us and you do technical research in a team, you’ve likely run into a set of canonical problems. For example:
- You’re looking at some amazing graphs done by someone who’s on vacation (or doesn’t work here anymore) and have no idea how they were generated.
- You’re looking at python code that implements a formula from a paper, but you can’t understand if that’s a matrix multiplication or a typo.
Sound familiar? We’ve found several tools that help us solve these kinds of challenges. Chief among them is Jupyter Notebooks.
If you aren’t familiar, Jupyter Notebooks offers “an open-source web application that allows you to create and share documents that contain live code, equations, visualizations and narrative text.”
The (very few) pitfalls of Jupyter Notebooks
Although notebooks are a great tool, we started running into a few bumps as soon we started to scale them across several teams. Here are some of the challenges we faced:
- Keeping content up to date was a pain and required all authors of notebooks to also know how to use git.
Sharing research projects with different employees and teams required us to send notebooks via Slack or other means. - Sharing notebooks from one user to another didn’t always work due to package dependencies that one user had that another user didn’t.
- Data sprawl was challenging — data was on employee laptops, couldn’t easily be shared and would eventually need to be deleted by the employee.
- Managing credentials and API keys for each notebook wasn’t convenient.
- There wasn’t an easy way to “productionize” a notebook — meaning we couldn’t take a notebook that solved a problem for our operations team and make it available to everyone without sending it to them all or having them check out the notebook locally, install all dependencies and run the notebook when they wanted to use it.
The good news, though, is that there are plenty of other tech teams that use notebooks, along with data science companies that help other orgs solve challenges just like these. So we looked into how Netflix uses notebooks (Beyond Interactive: Notebook Innovation at Netflix, Part 2: Scheduling Notebooks at Netflix). We even tried deploying AirBnB’s Knowledge Repo. We looked at a couple data science platforms but quickly discovered that we’d only need to use a small subset of their features so we couldn’t justify the high cost.
TL;DR: Our team loved Jupyter Notebooks but needed a more centralized model to make them work effectively across our company.
JupyterHub saves the day
After doing some additional research, we discovered JupyterHub. And it was exactly what we were looking for to help our notebook scale.
What’s JupyterHub, exactly? The JupyterHub website says it best:
JupyterHub brings the power of notebooks to groups of users. It gives users access to computational environments and resources without burdening the users with installation and maintenance tasks. Users – including students, researchers, and data scientists – can get their work done in their own workspaces on shared resources which can be managed efficiently by system administrators.
JupyterHub runs in the cloud or on your own hardware, and makes it possible to serve a pre-configured data science environment to any user in the world. It is customizable and scalable, and is suitable for small and large teams, academic courses, and large-scale infrastructure.
In security nerd speak, JupyterHub creates a multi-user server where each user kernel is an isolated python process. This means that two users can run the same notebook with different input parameters and get different results — and that capability alone solves several of our problems.
Benefits of centralizing notebooks using JupyterHub
After setting up JupyterHub (more on that in a minute), we quickly discovered lots of benefits of centralizing our teams’ notebooks:
- Notebooks are accessible across the org by default, which meant we didn’t have to send .ipynb files back and forth.
- End users don’t have to worry about keeping their content up to date in a GitHub repo — because users are doing their work in JupyterHub, notebooks are always up to date.
- Everyone uses the same environment with JupyterHub, which reduces the chances of the team running into dependency issues.
- There’s no need to store data on employee laptops, which means you know where your customers’ data is at all times.
- We provide a convenient way for users to leverage API keys and user credentials.
- We can “productionize” a notebook simply by having a directory hierarchy that supports the notion of “supported” notebooks that are versioned (more on this later). This means we don’t have to
- Slack users about updates to notebooks. Instead we can upgrade the notebook they’re using on our central server.
- We centrally manage and monitor usage to keep customer data safe.
How to set up JupyterHub
When we build new infrastructure here at Expel or start to use new platforms, we always try to reuse previously defined engineering processes. In this case, we already use CircleCI for CI, GitHub for revision control and Ansible / Terraform for infrastructure management/deployment. We decided that using these existing tools and processes would make it easier to manage and scale the service over the long term (and it’ll keep our Site Reliability Engineers (SREs) happy). Using our existing tools and processes also means we can easily manage packages, control versions of productionized notebooks and more. We also knew that for notebooks that were used by more than a few people, we should version those so that if something goes wrong we can easily roll them back.
So our JupyterHub setup looks like this:

We stood up our JupyterHub environment in Google Cloud Platform, but you could easily follow a similar workflow as shown above if you’re using Microsoft Azure or Amazon Web Services or even setting this up on prem.
JupyterHub (to its credit) has a lot of configuration options. These are accessible through jupyterhub_config.py. It’s somewhat overwhelming how much you can configure. To make it easier for you to wade through the many options, we’ll share a couple of the configuration options that we tweaked and why.
Authentication
JupyterHub has amazing support for various authentication mechanisms. That’s great for us. We choose to use OAuth which allows us to enforce multi-factor authentication but also gives Expel employees easy access.
Default URL
Using the default URL setting, we built a landing page which allowed new users to get up to speed faster. In practice, all we had to do was add this line of code within the JupyterHub configuration:
c.Spawner.default_url = '/notebooks/Welcome.ipynb'
This configuration forces a redirect when users log into a specific page. In our case the page provided new users with a set of “getting started” tips including rules of the road — telling folks who are new what not to do (storing passwords and auth tokens in notebooks, for instance) to help them get off on the right foot. Even better, we provide examples of how to do those things correctly.
Landing page
We customized our landing page for JupyterHub Notebooks, and created a list of FAQs to address some of the questions our initial devs got used to answering. Here’s a screenshot of our welcome page:
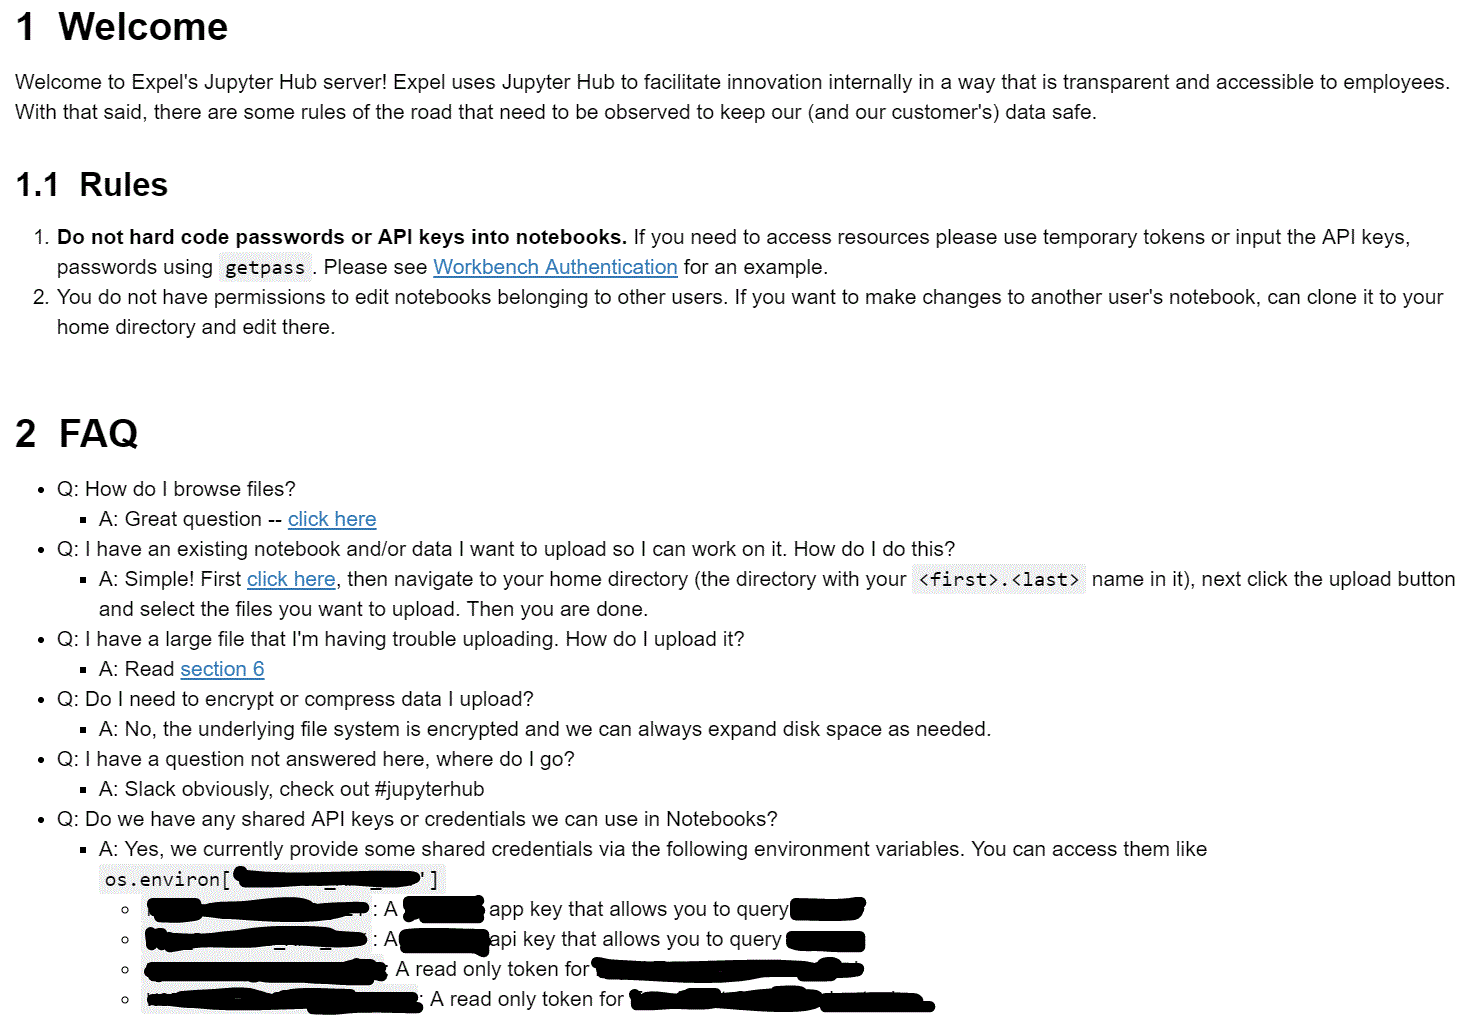
Getting Started / Example notebooks: We have example notebooks that show how to log into our system and access data, and we also have example notebooks that access DataDog and other common services.
Notebook header guidelines: We want to have some consistency in our notebooks so we ask users to follow a very simple template pattern so that it’s easy to understand what the purpose of the notebook is etc. Below is the markdown we recommend Expel employees use when creating a new notebook:
# Notebook Name
## Purpose
What are you trying to do with this notebook?
## Audience
Who is this notebook developed for?
## Data Sources
* Data source 1
* Data source 2
## Description (How does it work?)
1. Step 1
2. Step 2
3. Step 3
…
## Parameters
Parameter | Description
——— | ———–
PARAM_1 | Blah blah
PARAM_2 | Blah blah
## References
* Links to documentation or external references
Environmental Variables
We decided early on to make accessing various services as easy as accessing a list of defined environmental variables. We set all of our environmental variables via c.Spawner.environment which allows each instance of a notebook to have the same environmental variables. This way if a user wants to pull metrics from DataDog he doesn’t have to generate his own API/APP key and instead can use the one on JupyterHub. The same is true for other services.
More JupyterHub tips and tricks
Once you’ve got JupyterHub up and running, it’s easy to perform simple tasks related to notebooks, like deploying new ones or managing notebook content. Here are a couple tricks we learned along our JupyterHub journey that might be helpful as you’re getting JupyterHub set up in your own org.
How to deploy new JupyterHub notebooks
We’ve gotten a lot of mileage out of applying some DevOps patterns to our JupyterHub deployment. As an example, we were able to leverage the github template repos to build a notebook template. This allows a new user to click a few buttons and have all the boiler-plate for running a notebook in our environment without having to cut-and-paste anything.
This mirrors what we’ve done in our product development, where we’ve built out templates for services in Golang, Python and Node.js.

We decided to create a templatenotebook repo (see the image above) to make it easy for authors to move and manage specific notebooks in GitHub. The CircleCI process I talked about earlier that kicks off builds an RPM with the notebook and the tagged version. This allows authors to version notebooks for deployment and allows us to roll them back if we accidentally introduce a bug.
How to adjust filesystem permissions in JupyterHub
One challenge we knew we needed to solve (and hoped JupyterHub could help) was to effectively manage notebook content on the filesystem in a way that allowed users to safely read and execute each other’s notebooks. In order to do this, we tied unix groups and filesystem permissions together with our OAuth integration. Each new user is automatically added to a developer group that has read and execute privileges on all other home directories. This allows our analysts to run notebooks from other users, but not modify them.
If a notebook is deemed operationally important, we’ll move it out of a user’s home directory, create a GitHub repo to manage the check-ins, tag releases of the notebook that built RPMs and then deploy those RPMs and install the notebook to a specific directory (that is read-only and execute for all users). Then other team members can bookmark the location. To make sure we don’t lose our work, we run daily back ups and retain them for 14 days.
Our experience with JupyterHub (so far)
In just the few months we’ve had JupyterHub operationalized, we’ve seen awesome adoption among employees. Almost 100% of Expel employees who work with customers — that is everyone from our SOC analysts to our customer success team — has logged into the server at some point. We’ve seen an uptick in notebook creation, with 170 unique notebooks created in approximately two months’ time on JupyterHub versus the 15 notebooks previously checked into GitHub.
Up next for our use of JupyterHub at Expel is to be able to schedule the parameterized run of a set of notebooks. We’re looking into using papermill or paperboy for this. In addition, as we move our production infrastructure to Kubernetes, we’re looking to tightly integrate that, allowing users to run Kernels inside our Kubernetes infrastructure.
If you’re looking for ways to make research more accessible and easier to manage among your team(s), check out JupyterHub. Even if you don’t have much experience with it, JupyterHub’s documentation makes it easy for anyone to get up and running in no time.
In the coming months we’ll be releasing a few more blog posts that talk about specific use cases for JupyterHub — everything from using it for hunting decision support to how we’re using JupyterHub for tuning detection thresholds.
A huge thank you to Justin Willis and Reilly Herrewig-Pope on our infrastructure team. They were instrumental in helping configure, stand up and figure out how best to manage JupyterHub and our notebooks. Additionally, I’d like to thank Andrew Pritchett and Brandon Dossantos for not being happy with the status quo of notebooks + GitHub.


")
